Powered by Blogger.
Latest Post
Showing posts with label XP. Show all posts

2007 Microsoft Office Add-in: Microsoft Save as PDF

Written By MANOJ J on Saturday, 27 July 2013 | 08:40


                This download allows you to export and save to the PDF format in eight 2007 Microsoft Office programs. It also allows you to send files as e-mail attachments in the PDF format in a subset of these programs.

Download >>


Boot Dos from USB


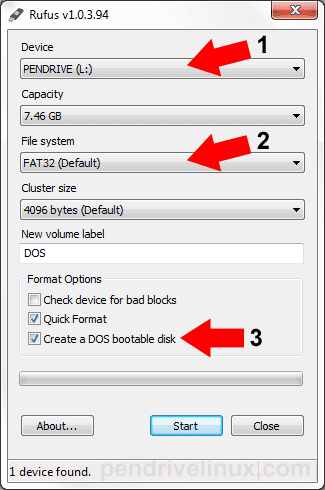
                Creating a DOS Bootable USB Flash drive to "Boot DOS from USB".a tool called Rufus.Rufus can also be used to create a Bootable USB version of a given distro from an ISO File.

Install application      Download >> Rufus

1) Select usb Device.

2) Select filesystem to FAT32

3) select Create a DOS bootable disk

4) Click start and enjoy.........


     more details  link

Multi OS are boot from pendrive


               YUMI - Multiboot USB Creator  is used to Multiboot ISOs.It can be used to create a Multiboot USB Flash Drive containing multiple operating systems, antivirus utilities, disc cloning, diagnostic tools, and more.

               YUMI uses syslinux to boot extracted distributions stored on the USB device, and reverts to using grub to Boot Multiple ISO files from USB, if necessary.


Download >>  YUMI - Multiboot USB Creator (Windows)
    

more details link          

vim install in Windows

Written By MANOJ J on Friday, 26 July 2013 | 07:19


Download Vim for Windows

Download >>   gvim72.exe  directly.

Configure gVim

  • On UNIX platform Vim configuration file is called .vimrc
  • On Windows platform the vim configuration file is called _vimrc
  • _vimrc file is located under $HOME/_vimrc. For example: C:\Documents and Settings\ramesh\_vimrc
  • Please note there is a _ (underscore) before vimrc on Windows platform

Simple tips

Written By MANOJ J on Monday, 22 July 2013 | 01:24

1.Switch to welcome screen

Press Win+L to switch to the Welcome screen.

2.Lock your workstation

Press Win+L to lock your workstation.

3.Switch user easly

You can switch users without going through the Welcome screen: From Task Manager, go to the Users tab, right-click a user, and select Connect.

4.Hibrernate computer

Hold down the shift key in the shutdown dialog to change "Stand By" to "Hibernate". Or just press H to hibernate instantly. You can even use the Power Control Panel to configure your power button to hibernate.

5.Disable password when resuming stanby

To disable the password when resuming from standby or hibernation, open the Power Control Panel and uncheck "Prompt for password after returning from standby" on the Advanced tab.

6.Shut down via Remote Desktop

To shut down via Remote Desktop, click the Start button, then type Alt+F4. 

Restrict folder access in Group Policy Editor

               In Group Policy Editor you can restrict folder access by disabling Simple File Sharing and then right-clicking the folder you would like to protect and selecting 'Properties'. Move to the 'Security' tab and you're ready to restrict folder access.
            Now 'Add' and then select the user you would like to restrict. Tick the top box in the 'Deny' column to prevent the selected user from accessing, viewing or modifying the files in the folder you selected.

Disable autorun for discs

                Put a disc in your CD/DVD drive and you'll notice an appreciable lag as it spins up, even if you're not just about to use it. If you don't always need your CDs and DVDs to launch automatically when you insert them, the needless spinning up of the discs can slow your machine down.

You can disable CD autorun by modifying this registry key:

'HKEY_LOCAL_MACHINE\SYSTEM\CurrentControlSet\Services\Cdrom'. Double-click the 'AutoRun Dword' value and set it to '0'. Change it to '1' to restore it.

Edit your drive names

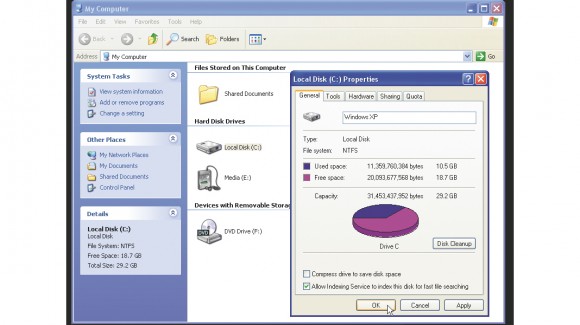
                If you've split your hard drive into two or more partitions, renaming drives can make them easier to identify. Partitions enable you to store groups of data separately from each other on your computer - effectively like having multiple hard drives. Simply right-click a hard drive partition in My Computer, select Properties, and enter a new label.

Make custom icons

         
           If you decide to make your own custom icons, there are a few things to be aware of. First, they come in different sizes according to where they are displayed, such as the desktop, the Start menu, Folders, Drives, and so on.
         Icons are measured in pixels, and the three sizes used on Windows XP are 16 x 16, 32 x 32 and 48 x 48. Second, icons use a 32-bit palette, enabling you to use any colour that the eye can detect.
         In the past, icons were either opaque (solid), or completely transparent, making them appear as sharp-edged cutouts on the screen. Now, they can gently fade into the background, and you can create subtle shadow effects.
         Finally, the default Windows icons are packaged and encoded into the shell32.dll, and many program icons are similarly hard-coded. If you choose to replace these icons, you can either select any of the default icons, or you can add icons you've downloaded from the internet or created yourself in an image editor or icon creator. Individual icons have the ICO file extension, while icon groups have the ICL extension.

Shut Down from Your Desktop

          If you're trying to eliminate every extraneous mouse click, you can shut down your computer with an icon on the desktop. Right-click on your desktop, click "New," and then click "Shortcut." In the "Type the location of the item" field, type "shutdown -s -t 00" to give you a way to shut down the computer immediately. (Change the -s to -r to create a reboot shortcut instead.)

Control Inactive System Tray Icons

Written By MANOJ J on Sunday, 21 July 2013 | 23:54


                You don't have to hide or show all the icons in your system tray—you can control their disappearing acts. Right-click on the taskbar and select Properties. Click on the checkbox next to "Hide inactive icons" (if it's not checked by default), then click on the Customize button. For each item on this list, you can choose "Hide when inactive," "Always hide," or "Always show" options to decide what you'll see and when.

Internet Diagnose the problem

Written By MANOJ J on Friday, 19 July 2013 | 08:48


1) Click Start

2) click Run

3) type %windir%\network diagnostic\xpnetdiag.exe

4) click OK.

How to Protect your Files from Other Network Users by Disabling Administrative Share

Written By MANOJ J on Thursday, 18 July 2013 | 23:16

Finding out if your Windows operating system created administrative shares


1.    Right-click on My Computer on the desktop and select Manage
2.    After the Computer Management console loads, expand Shared Folders
3.    Select Shares

4.    Look at the right side and see if your partitions are shared. It is easy to spot because it will look something like C$ or D$ which is dependent on your computer’s drive letters

If you find one or all of your partitions there, then you’ve got administrative shares. You should seriously consider disabling it to secure your computer.
Loading the Registry Editor

The best way to do this is to change a value in the registry. Follow the steps below to load the Registry Editor.

1.    Press the Start button
2.    Select Run
3.    Type Regedit in the dialog box
4.    Select Ok and the Registry Editor loads afterwards


Disabling administrative shares
In this task, we need to go to HKEY_LOCAL_MACHINE\System\CurrentControlSet\Services\LanManServer
\Parameters

To get there, please follow the steps below.

1.             Expand HKEY_LOCAL_MACHINE
2.             Expand System
3.             Expand CurrentControlSet
4.             Expand Services
5.             Expand LanManServer
6.             Select Parameters
7.             Look for the REG_DWORD entry named AutoShareWks
8.             Double-click on it and change the value to 0


In case the entry AutoShareWks does not exist, do the following:

1.    Right-click on the right side of the editor
2.    Select New, then DWORD
3.    Type AutoShareWks as the name of the entry
4.    Check that the value is 0
5.    Close the editor
6.    Reboot the computer

After rebooting, go back to the Computer Management console and check the shares again. It should now look something like the picture below.

Your files are now safe from other network users.


How to get to a MS-DOS prompt


Windows 8 users

  1. From the Start screen type cmd and press enter.
or
  1. Move the mouse cursor to the very bottom-left corner of the screen and right-click or press Windows key + X.
  2. This will open the power user task menu, select either Command Prompt or Command Prompt (Admin).

Windows Vista and 7 users

  1. Click Start.
  2. Type cmd and press enter.
 If you're attempting to get into a MS-DOS prompt to troubleshoot the computer boot the computer into Safe Mode.

 Windows NT, 2000, and XP users

  1. Click Start.
  2. Click Run.
  3. Type cmd or command and press enter.
 Windows 95, 98, and ME users

  1. Click Start
  2. Click Run
  3. Type "command" and press enter.


Microsoft Windows shortcut keys


Alt + Tab

             Switch between open applications in all versions of Windows. Reverse the direction by pressing Alt + Shift + Tab at the same time.

Ctrl + Tab

            Switches between program groups, tabs, or document windows in applications that support this feature. Reverse the direction by pressing Ctrl + Shift + Tab at the same time.

Alt + Print Screen

           Create a screen shot only for the active program window in all versions of Windows. For example, if you opened the calculator and did this only the calculator window would be created as a screen shot. If just the Print Screen key is pressed the whole screen will be made into a screen shot.

Ctrl + Alt + Del

           Open the Windows option screen for locking computer, switching user, Task Manager, etc. in later versions of Windows. Pressing Ctrl+Alt+Del multiple times will reboot the computer.

Ctrl + Shift + Esc

Immediately bring up the Windows Task Manager in Windows 2000 and later.

Ctrl + Esc

Open the Windows Start menu in most versions of Windows. In Windows 8 this will open the Start screen and in Windows 3.x this would bring up the Task Manager.

Alt + Esc

Switch between open applications on Taskbar in Windows 95 and later.

Alt + Space bar

Drops down the window control menu for the currently open Windows program in Windows 95 and later.

Alt + Enter

Opens properties window of selected icon or program in Windows 95 and later.

Alt + Space bar

Open the control menu for the current window open in all versions of Windows.

Shift + Del

Will delete any file or other object without throwing it into the Recycle Bin in Windows 95 and later.

Hold down the Shift key

When putting in an audio CD or other CD that uses Autoplay, holding down the Shift key will prevent that CD from playing.
 
Support : Creating Website | Johny Template | Mas Template
Copyright © 2013. test3 - All Rights Reserved
Template Created by Creating Website Published by Mas Template
Proudly powered by Blogger